| | 
|
Notificaciones
Limpiar todo

Buenas tardes
Desde hace 2 meses soy un usario de este amplificador y estoy satisfecho con su funcionamiento, he ganado en comodidad y rapidez, sacrificando algunos watios respecto a mi anterior Acom 1000.
Desde hace unas semanas, despues de transmitir usando el ampli, de vez en cuando el equipo se queda sordo, como si no conmutara bien a Rx. He leido en el foro yahoo de este amplificador que es un fallo conocido de este modelo que se corrigio a partir del s/n 110901196 cambiando los 2 relays "Kin & Kout" de fabricacion italiana "Carlo Gavazzi" (de color negro) por unos "Finder" (de color blanco).
¿Alguien ha sufrido este problema? Me ha sorprendido no haber leido nada por este foro, a lo mejor es que a nadie le ha sucedido.
Por favor comentar vuestras experiencias y si habeis hecho la modificación de los relays.
Este es el mensaje en el que SPE reconoce el problema en Febrero de 2011
Escribió:Rx sensitivity when switching tx to rxTo be more clear I want to tell you the story from the SPE side.
The phenomenon began to occur after about 3 years of market presence, at first it appeared very confused because explained by the customers according to their technical knowing and ..... character.
After much speculation the following considerations appeared clear:
- It was not hot switching because the phenomenon does not exist in the Expert.
- The problem appeared just in the two RTX switching relays (Kin and Kout) and not in all the other relays of the ATU.
- The problem could not be fully charged of the heating because these relays manage different powers (very low in Kin).
- The problem was only related to the RX contacts.
Because we are big buyers of relays for our other activities (we consume about 200,000 a year) we could ask for advice to various manufacturers.
To be very concise:
- The return spring, being formed by the contact center, after many operations lost a bit of strength.
- The relays interested in the issue were part of a single production, this could indicate a lower quality of the product.
Remedies:
- We have changed the manufacturer.
- On the advice of the new manufacturer, we have doubled the contacts so as to reduce the likelihood of this problem to infinitesimal level.
The care has had its effect because from that time the problem is gone and will not ever occurred in a 2K which manage very large power.
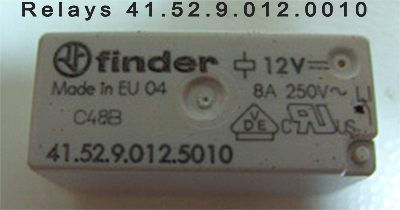
At that time the relays 41.52.9.012.5010 were not available, on the recommendation of the manufacturer we have used the 41.52.9.012.0010 with great results.
Have all a good week.
73
Gianfranco, I0ZY
EA2A Juanjo
Saludos desde Huesca
Inició el tema
http://www.ondaradio.es/productos/buscar.aspx?v=finder%2041.52
Ramon
ea3kp@yahoo.es
ea3kpbcn@gmail.com
Gracias por tu aporte Ramón, ya los tenia localizados.
La reparación no es cara, la pega es que hay que desmontar una placa del ampli para poder cambiar los relays, desoldando algunos conectores coaxiales y las entradas de RF.
Me gustaria conocer opiniones de alguien que haya tenido este problema, no creo que yo sea el único puesto que la propia marca lo ha reconocido y corregido en las nuevas unidades.
EA2A Juanjo
Saludos desde Huesca
Inició el tema
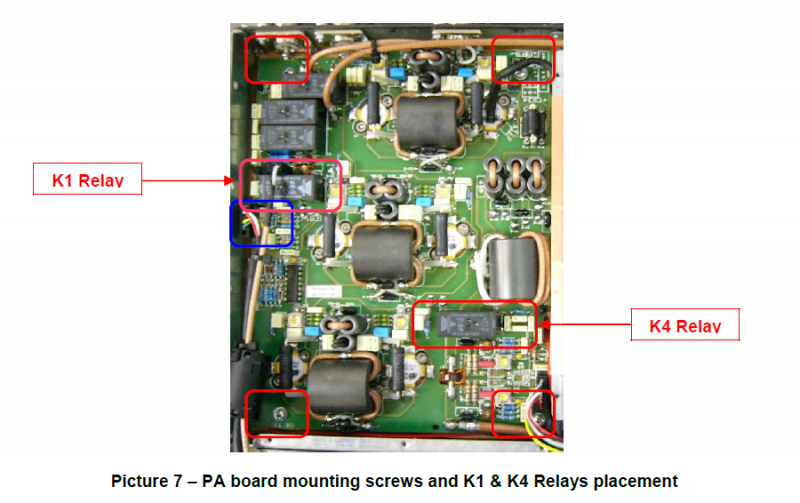
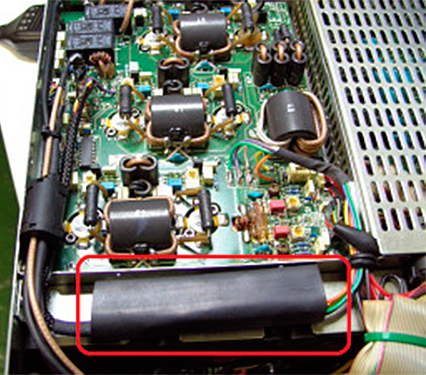
Adjunto imagen de la placa donde salen marcados los relays que hay que sustituir
EA2A Juanjo
Saludos desde Huesca
Inició el tema
Son de 12 o de 24 v?
Me corroe una terrible duda: Quedará algún español que todavía no se haya ido a la Mútua?.
Son de 12V.
EA2A Juanjo
Saludos desde Huesca
Inició el tema

Hola,
Con lo que cuesta el amplificador " SPE EXPERT 1K-FA linear amplifier " ¿podría usar relés de vacío?
Hay un foro de este tema en
http://groups.yahoo.com/neo/groups/Expertamp/conversations/topics/2702
http://forums.qrz.com/archive/index.php/t-280131.html
En la web de ON6UQ EXPERT 1K-FA REPAIR dice:
The power amplifier Expert 1K-FA from SPE could have problems with his relays. The famous K1 and K4 relays which disrupt the receipt partially or totally.
The description of the manufacturer is pretty well detailed. Still, there are points that are definitely need attention. It is largely about disassembling the PA circuit board with the intended relay.
Carefully follow the instructions of SPE and everything will run smoothly. Note the retaining rings under the screws so that they do not fall in the print or loose in the PA.
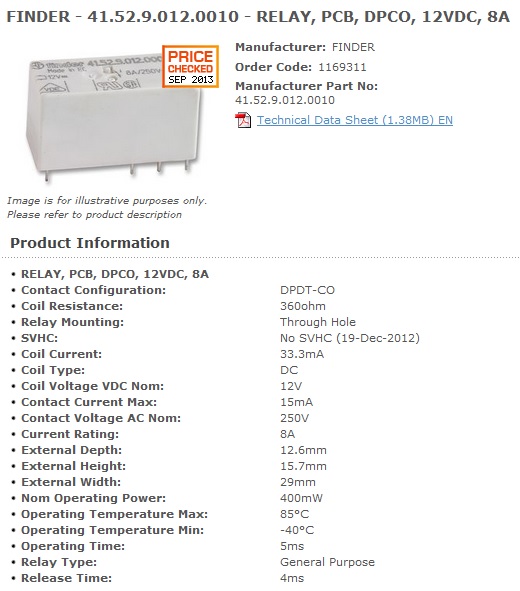
Here I show a method of soldering the relay out and a new return to the circuit board. Dont take the original relay, but with a FINDER relay type 41.52.9.012.5010 Low-Profile PCB Relay, DPDT 8A, 12V DC coil, AgNi+gold plated contact
· Producto en ONDARADIO barcelona precio del rele 41.52.9.012.5010 es de 7€
· Producto en PC24 ALEMANIA precio 11,19€ - otro rele es el 41.52.9.012.0010 precio aproximado de 9,77€
· Producto en HARDWARE.BE precio 11,37€ - otro rele es el 41.52.9.012.0010 precio aproximado de 9,93€
· Producto en ELEKTROBODE.NL No envían sus productos a nivel internacional.
· Producto en HAGEMEYER.NL
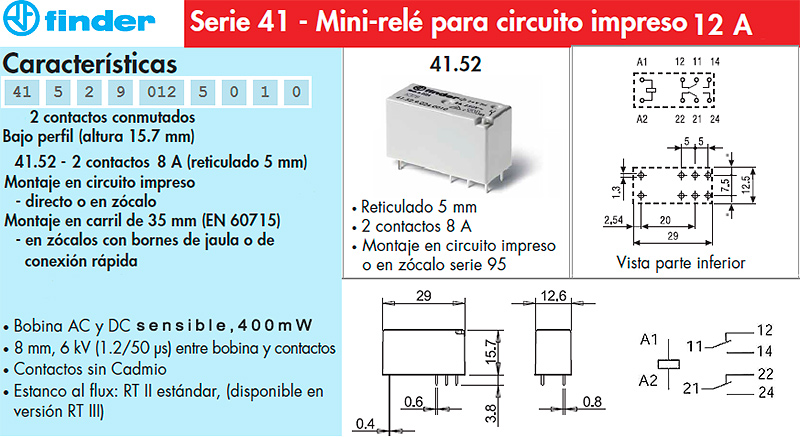
Caracteristicas del Mini-relé 415290125010 http://www.findernet.com/es/products/sku/415290125010 código serie 41.52
they have a special alloy of contacts and a layer of gold and even so good as vacuum relais and dont need a factory software upgrate.
you need 2 x four solder points simultaneously unsoldering. You need a special soldering iron with a flat yellow brass point that is equally wide than the solder points of the relay so you can heat the four solder points simultaneously, I made it myself. Make the angle of the solder iron sharp !! Dont overheat !!
Note that you have not damaged the small print guides. I have experienced it and this is not pleasant if you’re experiencing this when everything is already mounted
Now you get 8 solder points that are filled with solder and that simultaneously the lower with the upper layer connect.
Here you have to pay attention!! Take a darning needle and heated the hole and push the needle through the hole and keep the needle move. .
We place the relay outside the circuit board on the ledge for the print compartment.
Take 5 insulated wires of 30 cm (1 ft). Remove 5 mm insulation and insert them through the holes where the relay has stood and solder along both sides. Do this for K1 and K4. (0.75mm² wire)
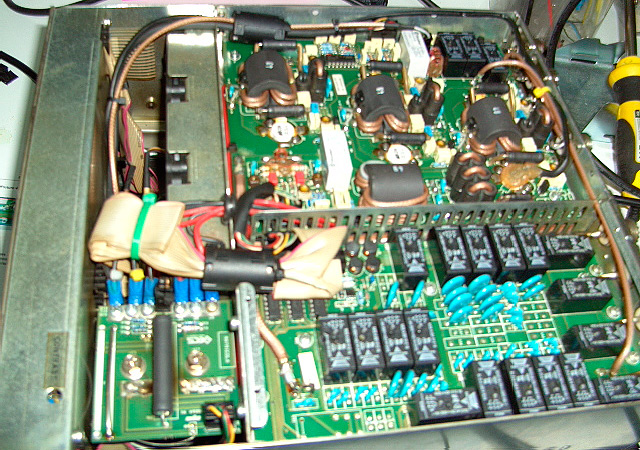
Foto 1-Reparado
In the original relay contacts are jumpered to one heavy.
This is not to the new relay and you should connect the contacts on the relay, NO to NO-NC to NC and common to common.
After placement, insolate the relay. Use a gain over the wires.
Place the circuit board back in the order that you have him dismantled.
For the tightening of the transistors have o a torque wrench needed in the order up to 20 Nm. pull all the screws of the transistors with a tension strength of 10Nm.
Don’t forget the heat conductive paste under the transistors.
Don’t forget the heat conductive paste under the transistors.
Digital StillCamera
Check all points again and close the PA and tuner case.
This is a very compact, well assembled amplifier despite the bad relay is he with this modification even better than befor.
http://ok1hra.nagano.cz/Expert_Schematic_diagramsII.pdf
What could be going wrong. By unsoldering take special attention to the thin
Replacing a front panel keyboard
It’s a keyboard in the form of a ‘ sticker ‘ that is pasted in place.
I can recommend you to read this document first.
Replacing is not hard but there are still things you should look for.
When you unscrew the front,
Note the Ribbon cables, which are quite short. Therefore, make your best for support of the whole. Mark all connectors, although there is little chance is to swap out.
Move the Ribbon cables as little as possible. When you removed the circuit board above the display board connector, pay special attention to the right connector. Hold the circuit board on the left side up so you can easily knock out the connector.
When the defective keyboard has been removed and the plexiglass is in place, you can be on the new sticker pasted.
This must be correct from the first time!! repetition is almost not possible when there are already too many are stuck on the glue.
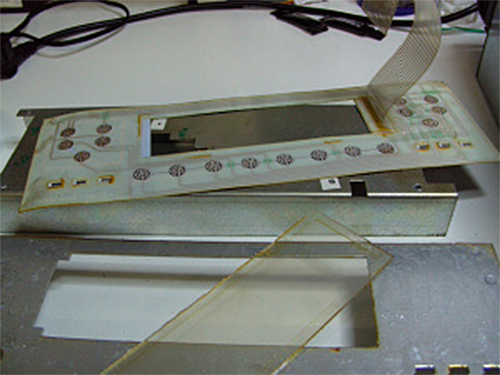
A critical point is also the ribon cable on the keybord and put this in to his socket.Tuck this ribbon cable not too short to avoid the chance to break.
ON6UQ April 2013
PS: If you not familiar with this technical stuff, do contact SPE, they have a fantastic
service. http://www.radio-ham.eu/eng/contatti.html
----
Mas información en:
PA board dismantling. EXPERT 1K-FA This document describes the fundamental steps for operating a correct dismantling of the PA (Power Amplifier)
· Informe de prueba Funkamateru 12/2006
---
73
Carlos EC1T
Ex. EA1DVY
Soria in81
Hola en la web de OZ6YM P. A. Andersen, Gerlev - Jaegerspris - Denmark
exponde como repara
Repair of SPE EXPERT 1k-fa, Automatic Antenna Tuner
My tuner stop tuning on bands with higher frequency than 7 MHz.
It tunes fine on 160 meter and 80 meter, with full power out.
I am a little impressed of SPE, Mr. Dante Specchioli - What a fine and express service from him!
I wrote to SPE, Rom, and Mr. Dante Specchioli send me a description on, how to remove the ATU from the EXPERT.
This you can find here: ATU_Removal.pdf
Ones before, I had the 1k-fa in Rom, Italy for repair under the warranty, and I can see where they have done some soldering on the boards.
Because of Mr. Dante Specchioli told me, that SPE was starting holly-day until september 1. 2012, and the FIELD-DAY Contest starts at the same time, I will try to find the error my self.
[img size=500] 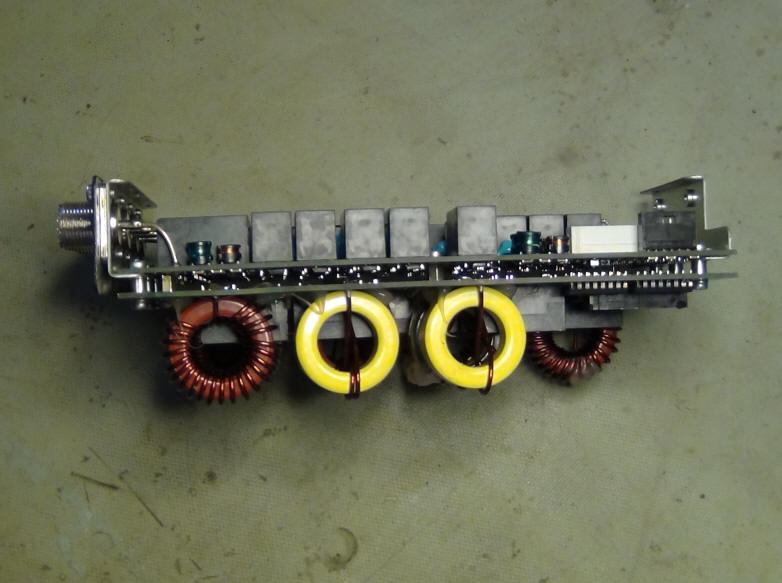 [/img]
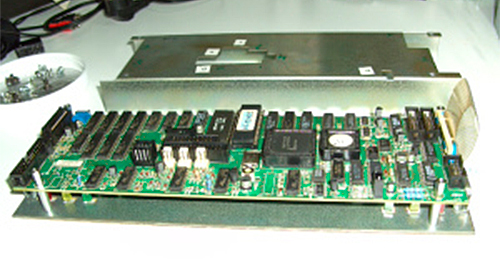
These 2 boards is put together with 9 screws.
No cables between the boards.
[img size=500] 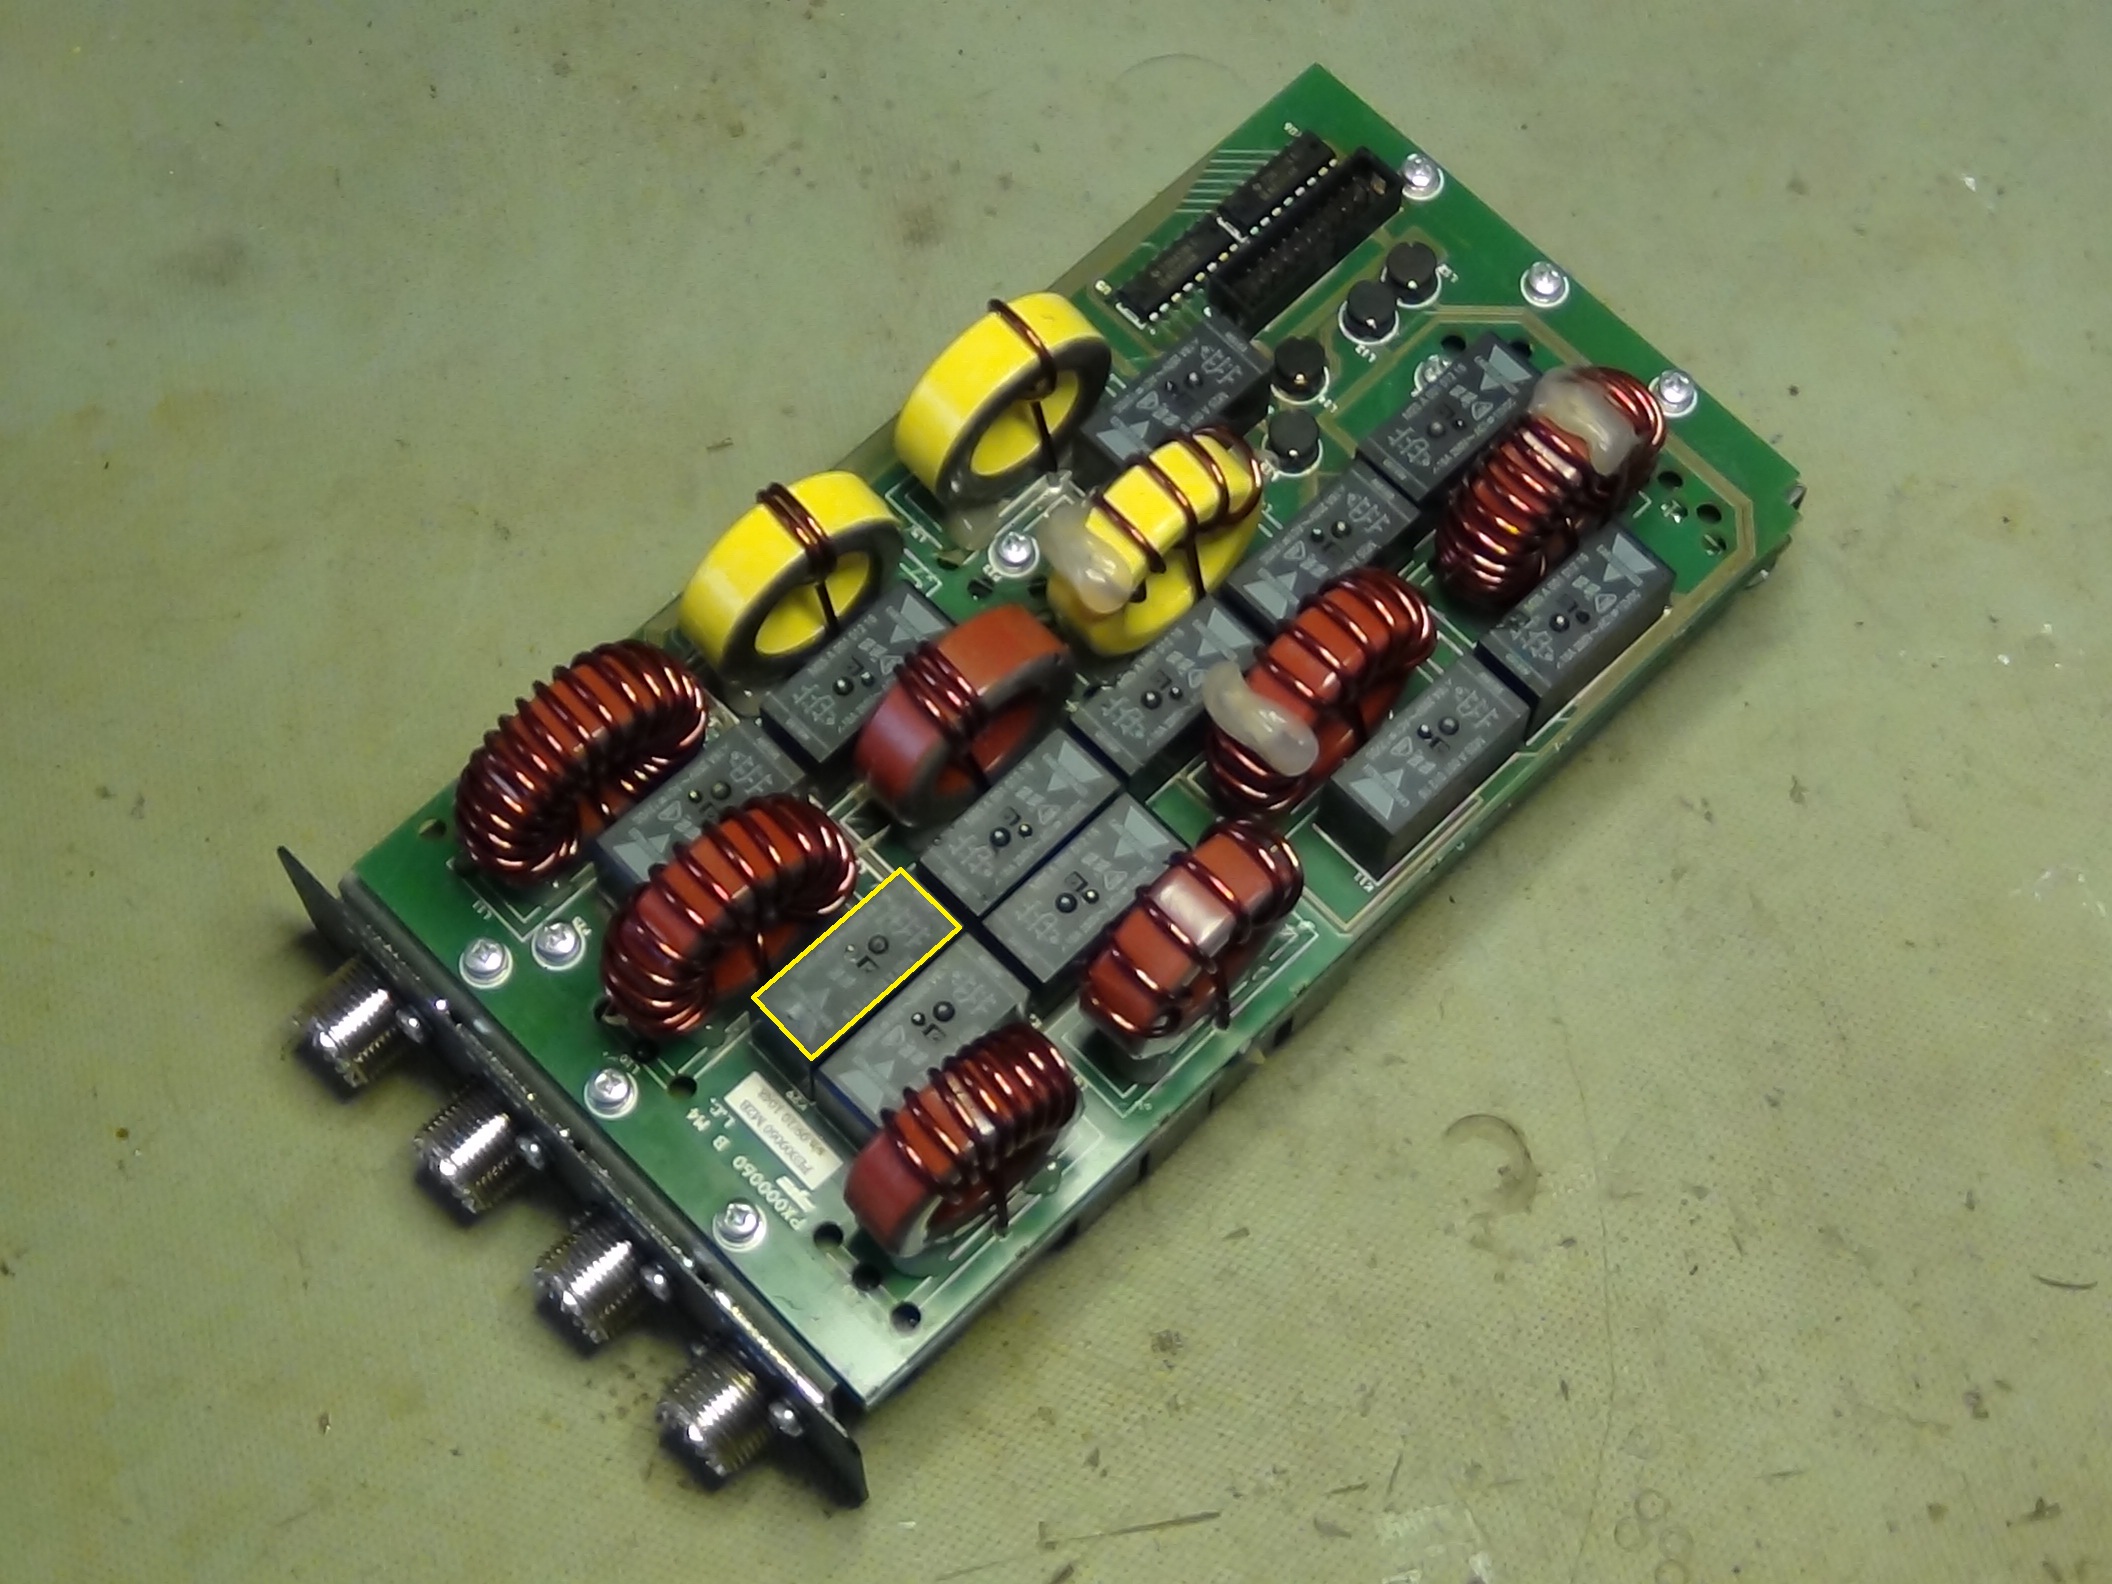 [/img]
reparado
[img size=500] 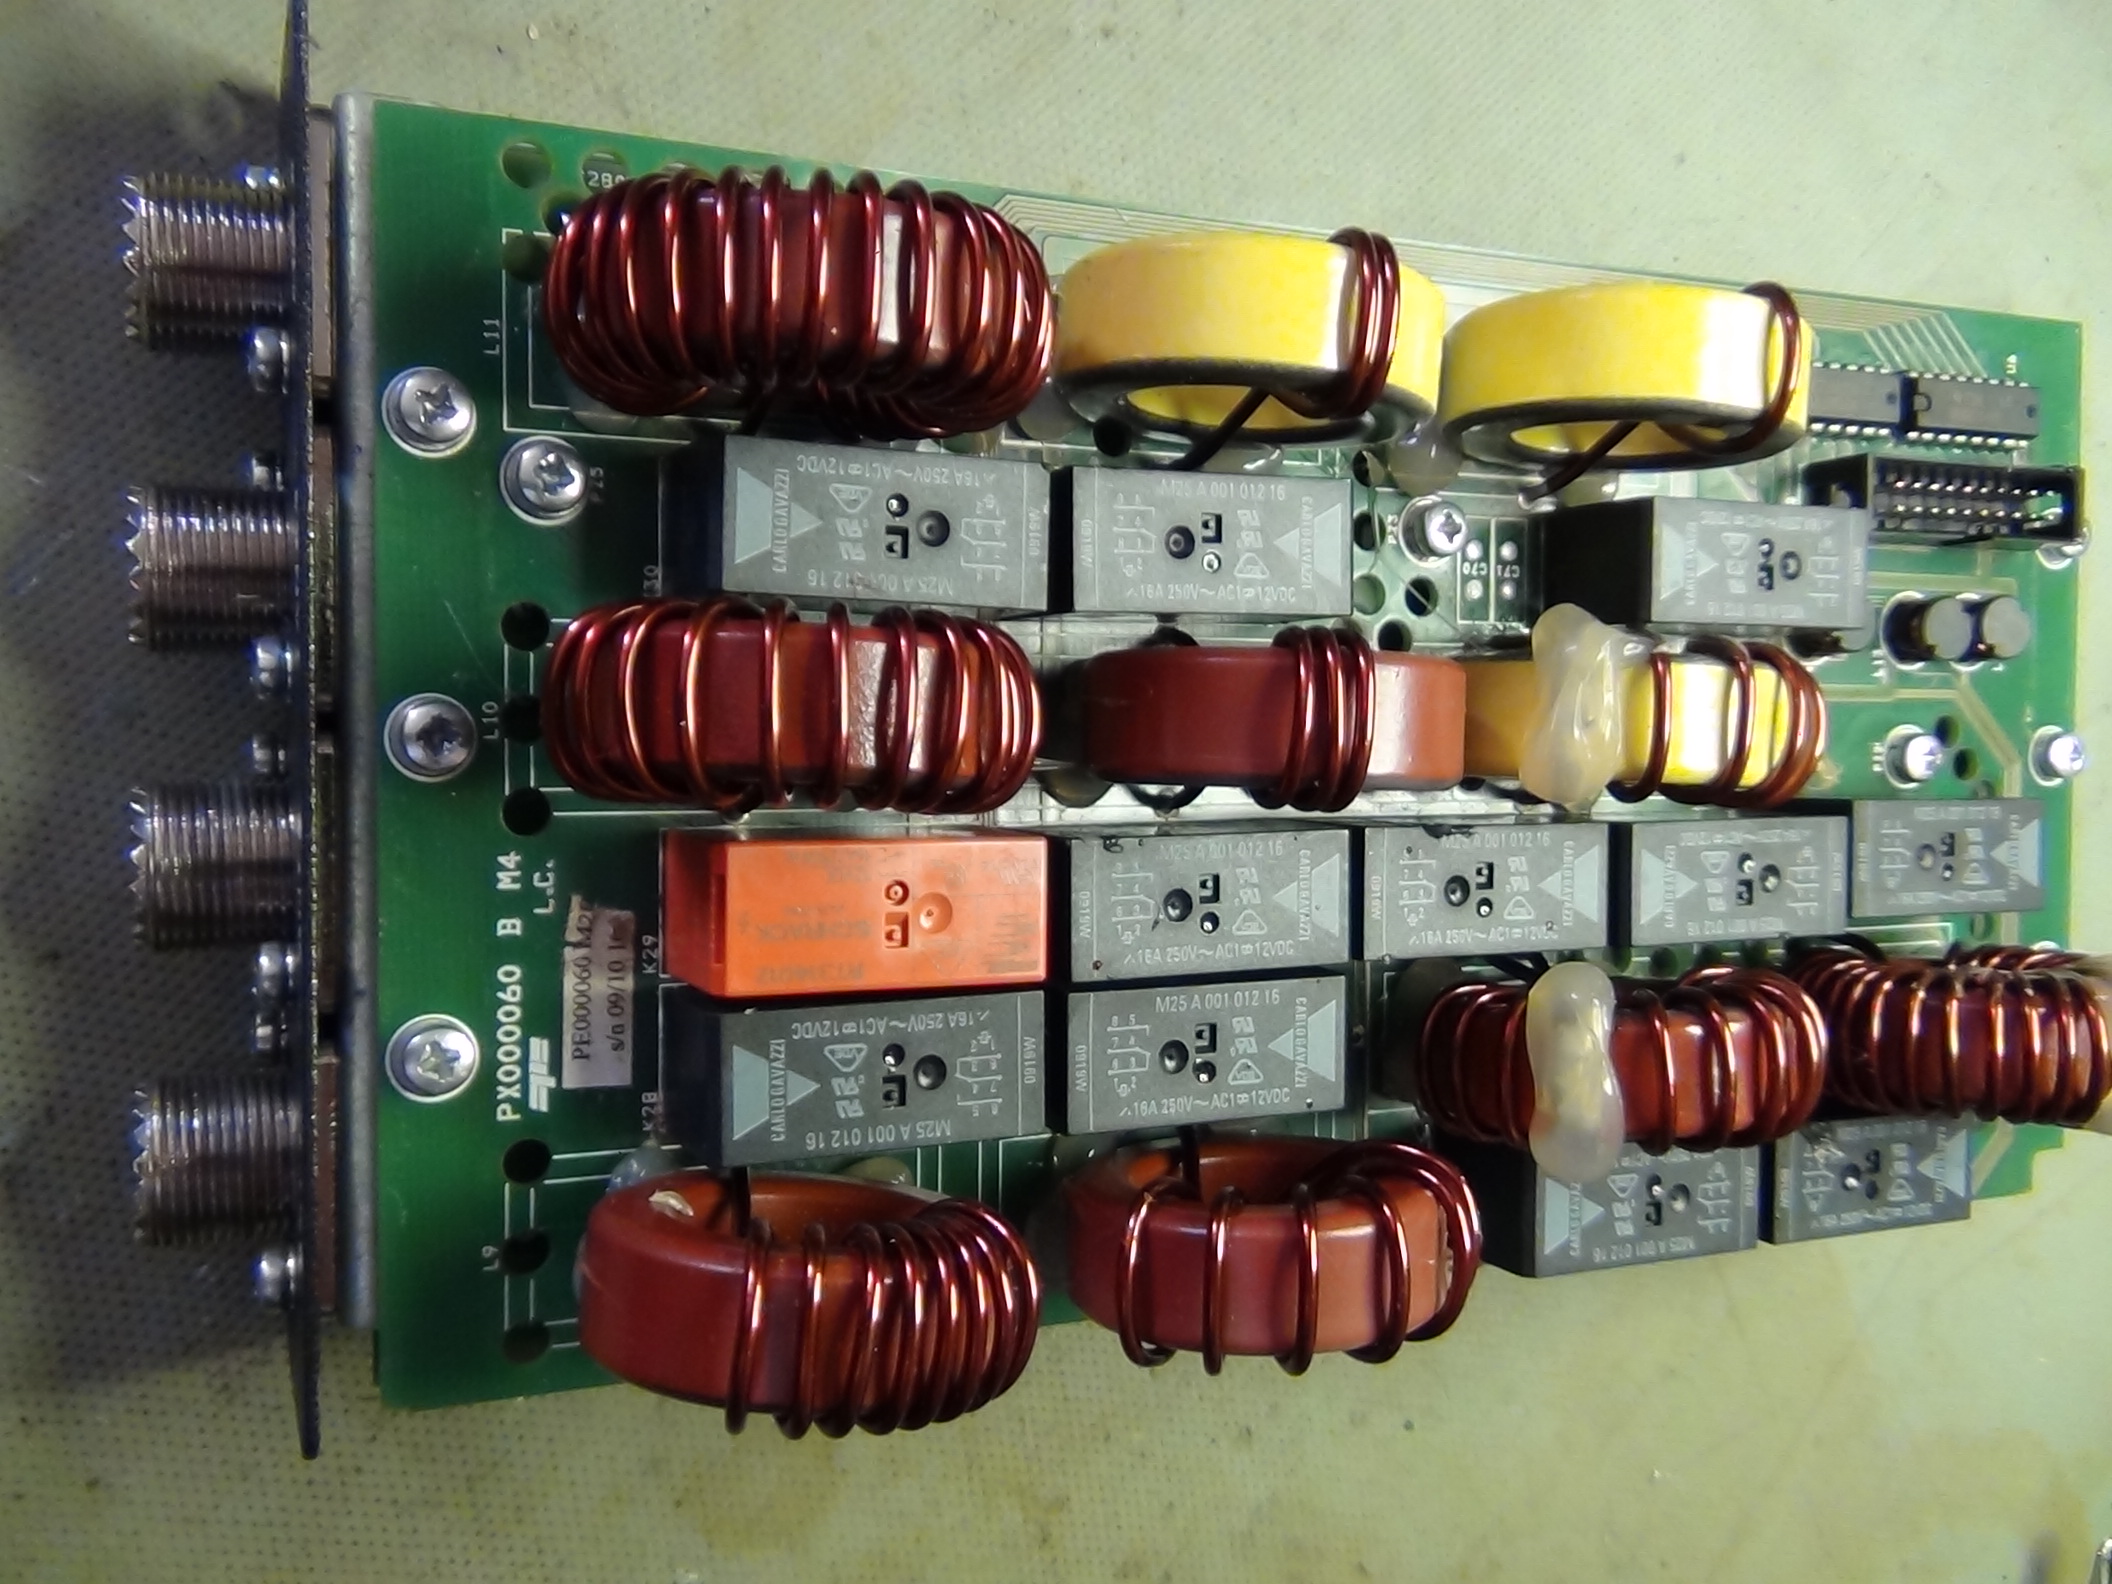 [/img]
[img size=500] 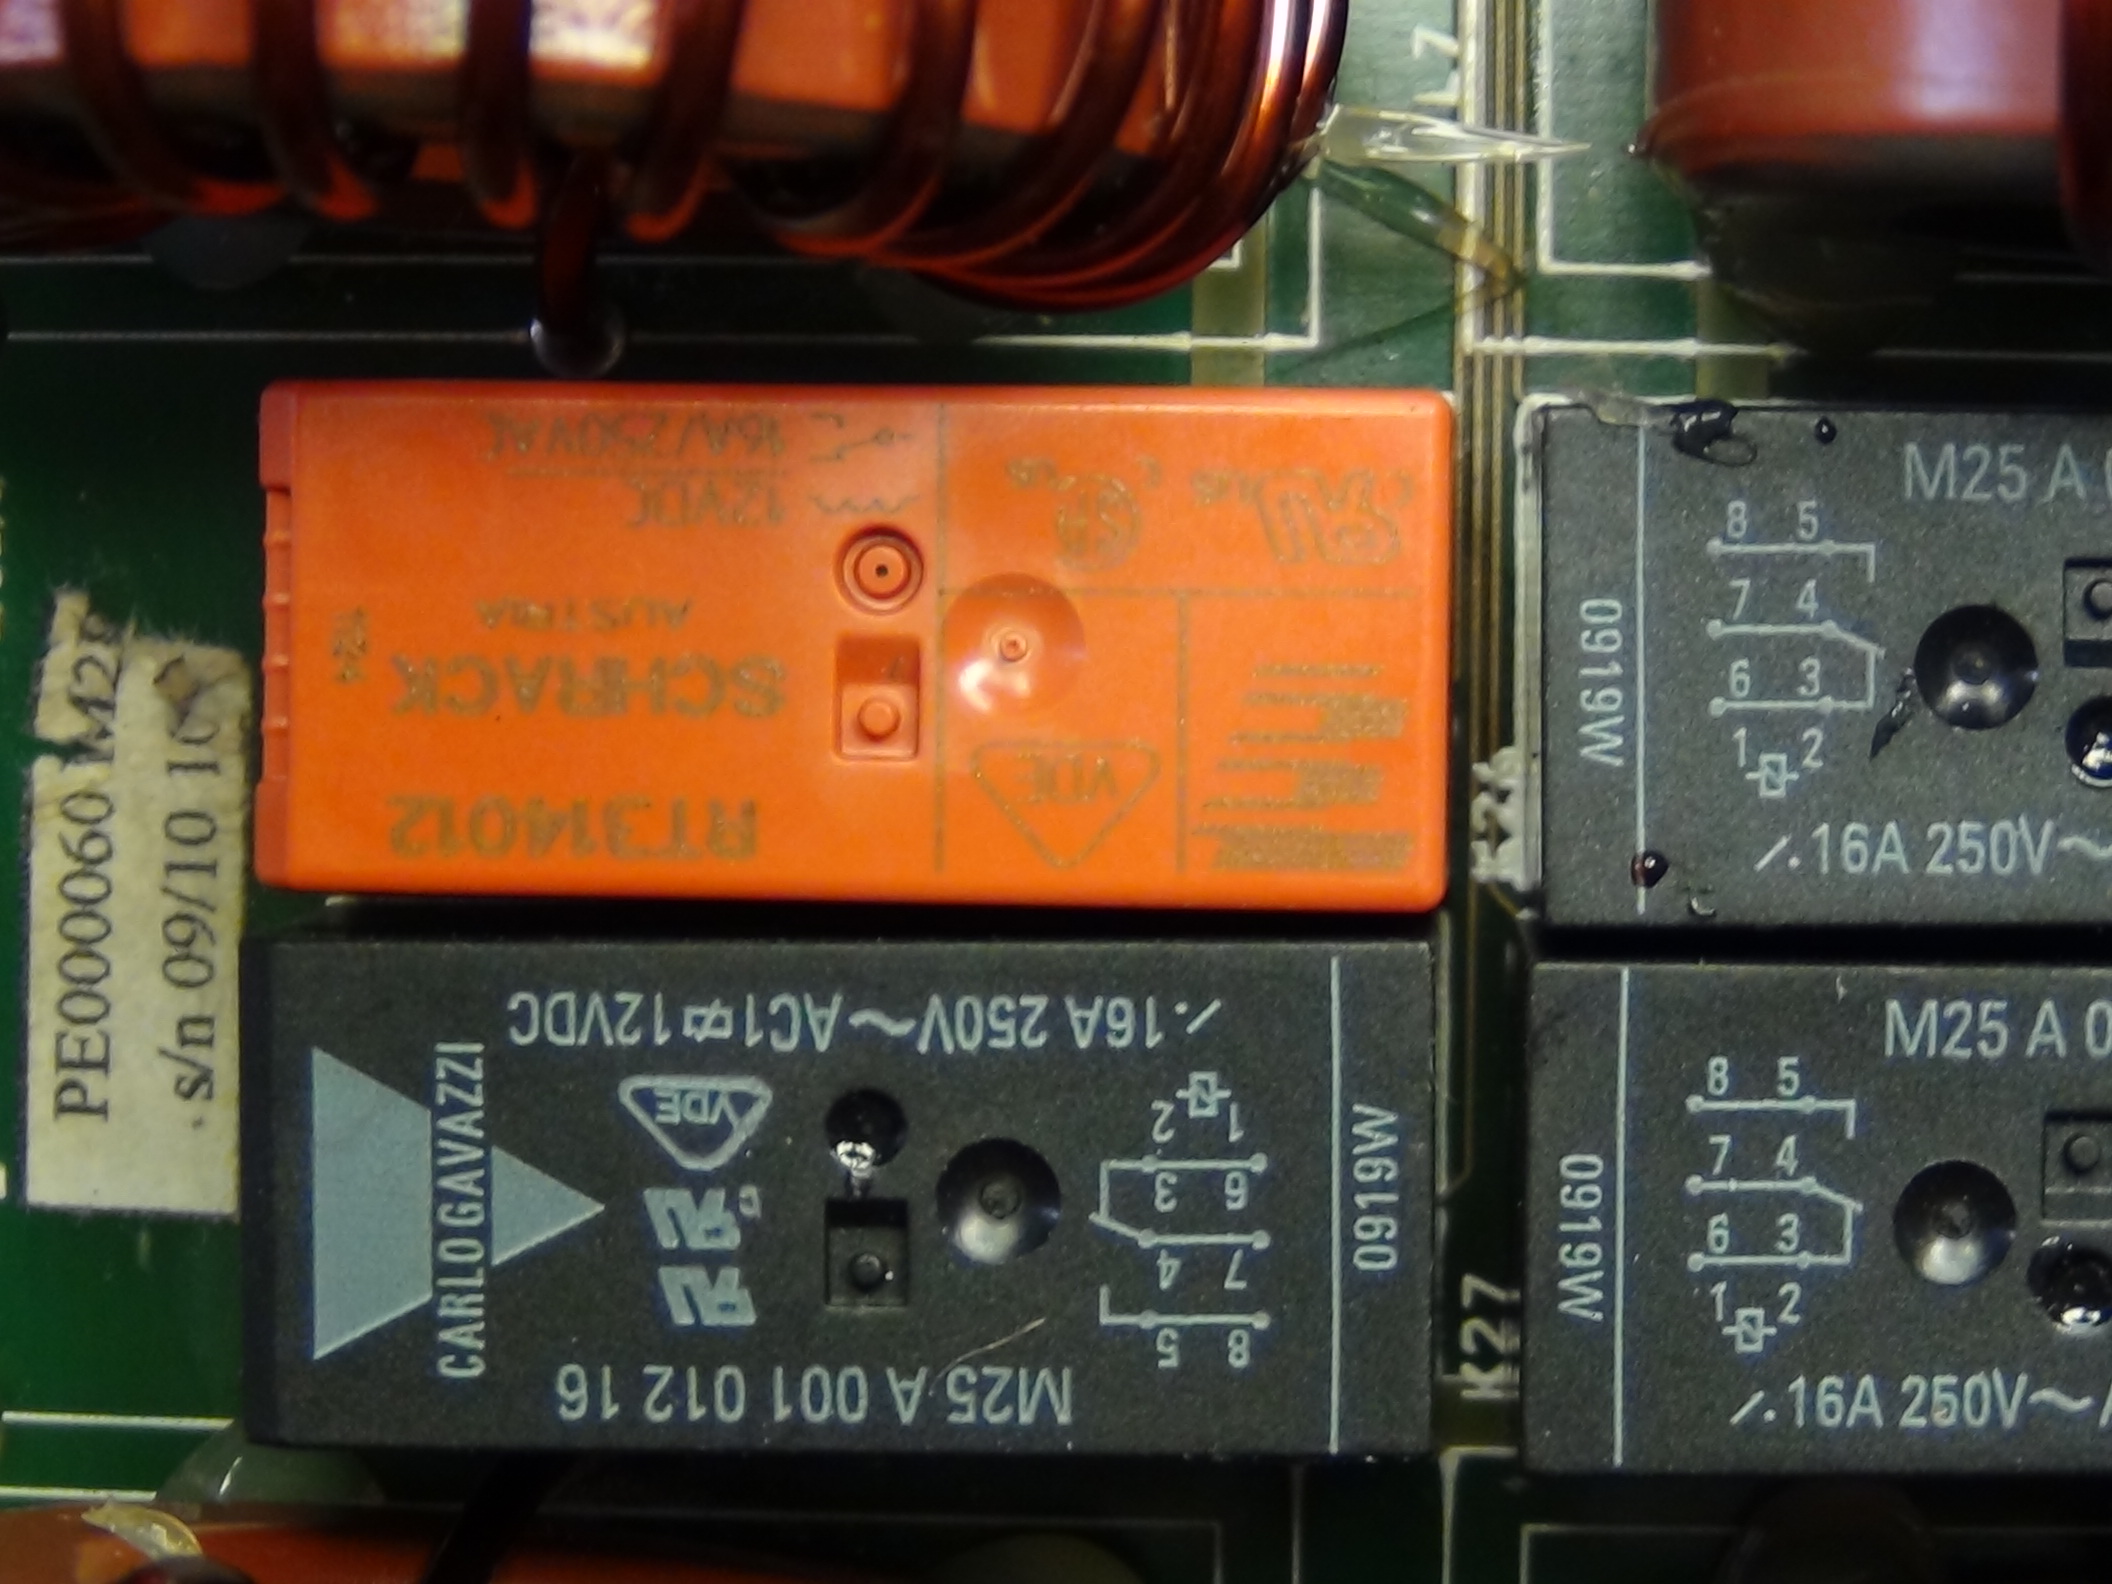 [/img]
Sunday afternoon...
Not the best weather to do the garden.
Turn on the radio ?
No... better try to find the ERROR in my ATU!
Start the lab.power, adjust to 11,5 volt.
Check all the relays on the INDUCTOR BOARD... Does they make a click-sound ?
Yes, Yes, Yes, Yes, No, Yes, Yes... Hej, one did NOT click... 
This one MUST be defect, K29, same as last time... the yellow marker...
Some times you got lucky...
Relay is removed and PCB is cleaned, ready to mount the new relay.
It look like the diode SM4007 ( the black one ) is broken to.
That could indicate, that I had a lightning storm or some static has killed my ATU..???
Maybe it would be a good idea to switch off the antenna when lightning comes...
Must think about that... More her...
The local Carlo Gavazzi dealer made me a call on the telephone to day, Monday.
They have these relay in stock, price 2 EU pc. + expenses, more then 30 EU for 2 pcs of relay... Hmmm..??
That's a lot of money for 2 pcs. of relays...
Another local dealer CYPAX have a compatible relay: RT314-12 SCHRACK 1SK 16A 12V 360R PE=20
Not expensive to, abt. 10 EU for 5 pc. all include...
That must bee the case...
NOT waiting on relays anymore...
Thursday the 16. august 2012... The relays is arrived...
ALL IS ON PLACE - ALL IS WORKING - ALL IS OK - 800 WATT out on 6 meter band.
END of PROJECT!!!!
informacion rele http://www.cypax.dk/vare/09.210.1012
See the pictures here.
. . .
73
Carlos EC1T
Ex. EA1DVY
Soria in81
Ayer recibí en casa los reles para realizar la reparación del Expert, he comprado los Finder referencia 41.52.9.012.5010 en Alemania ya que en España no me servian pedidos de menos de 20 unidades de esta referencia.
EA2A Juanjo
Saludos desde Huesca
Inició el tema
Acabo de intercambiar varios correos con Bob W5UQ, que es el técnico en USA de SPE Expert. Bob acaba de regresar a casa de la expedición 3DA0ET, por eso debido al "Jet lag" no puede dormir.
Me ha confirmado que para reparar esta averia lo unico que hay que hacer es desmontar la placa PA siguiendo las instrucciones de SPE , desoldar los reles originales y soldar los nuevos sin hacer nada más.
Modifico mi mensaje anterior en este foro para que no haya ninguna confusion.
EA2A Juanjo
Saludos desde Huesca
Inició el tema
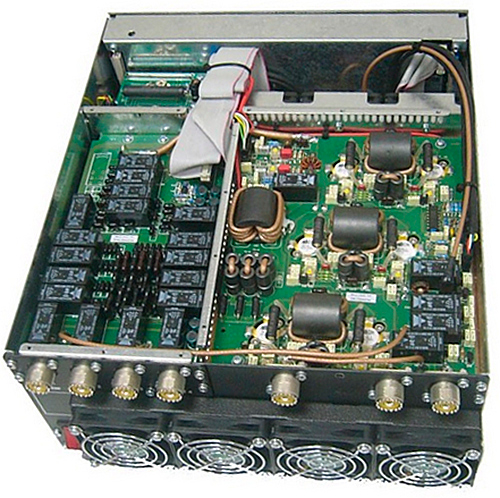
Juanjo, la placa a desmontar es esa en la que aparecen los toroides ferrita? .
Está situada por la parte de arriba o de abajo del aparato?.
Es fácil de hacer la reparfación?.
Me corroe una terrible duda: Quedará algún español que todavía no se haya ido a la Mútua?.
Aqui tienes las respuestas a tus preguntas, un saludo
http://www.ea2ok.com/2013/11/problema-con-el-expert-1k-fa.html
EA2A Juanjo
Saludos desde Huesca
Inició el tema
Este sábado por la tarde pudimos hacer la reparación del Expert.
Podéis leer mas información en esta página:
http://www.ea2ok.com/2013/12/expert-1k-fa-reparado.html
EA2A Juanjo
Saludos desde Huesca
Inició el tema
Alguien tiene el esquema del 1K de las primeras series?, el que no lleva S2R.
Los esquemas que encuentro por internet son de las segundas hornadas y no son iguales.
Hace unos días le cambié los relés al mío. Muchas gracias a Juanjo, EA2A, por tu ayuda y tu excelente blog. También al servicio técnico de SPE-Expert, que me envió el siguiente mensaje al respecto:
Good morning,
the relays we use in our products are Finder model
- 41.52.9.012.5010 gold plated contacts (3 eu + VAT each)
or
- 41.52.9.012.0010 silver plated contacts (2.5 eu + VAT each)
We use the gold plated model for TXRX relays.
The old "Gavazzi" relay has a single 16A contact.
The new Finder relay has 2 x 8A contacts in parallel = 16A
The replacement is just "remove the old one, install the new one".
No further mods needed.
Use a good desoldering station in order to do not damage the relays pad/tracks.
GL in repair
Best regards
TechSupp Staff-> Marco
S.P.E. Societa' Per L'Elettronica S.r.l.
e-mail: techsupp@linear-amplifier.com
website: www.linear-amplifier.com
De todas maneras, quería añadir un par de cosas que me parecen importantes, para el siguiente que lea este hilo en busca de información sobre el problema:
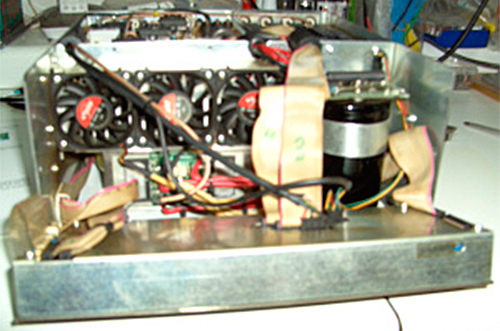
Como veréis en la foto adjunta, junto a uno de los transistores de potencia hay un termistor con una pata que ha de hacer buen contacto con la placa de cobre sobre la que se apoyan todos los transistores. Ese es un elemento fundamental del amplificador, porque se trata de la sonda de temperatura que informa al termómetro del amplificador para que se vayan disparando gradualmente las baterías de ventiladores según se va calentando, o que se desconecte para protegerse si se supera la temperatura máxima.
Tanto la sonda del termistor como los transistores de potencia deben hacer muy buen contacto con la placa de cobre, y para que sea así es esencial poner un poquito (sin pasarse) de pasta térmica conductiva de silicona esa sonda y en los dos lados de cada uno de los transistores (es decir, tanto en el propio transistor como en la zona de la placa de cobre donde toca ese transistor. Ya veréis que la pasta que había de origen está ya probablemente un poco reseca o directamente se ha convertido en polvillo.
Finalmente, es importante que los transistores queden nivelados para que hagan un contacto perfecto. Para ello hay que ir apretando poco a poco y por igual los dos tornillos de cabeza hexagonal de cada uno de los transistores, pasando de uno a otro tornillo alternativamente en lugar de apretar fuerte uno y luego el otro.
Lo más laborioso y delicado de la operación fue sin duda desoldar los relés viejos K1 y K4. Hace falta un buen desoldador para hacer eso, idealmente una estación desoldadora de vacío que nos permita regular la temperatura del aparato para no dañar las pistas del circuito. Yo tardé como una hora y media en todo el proceso, y eso que soy un zarpas, pero eso sí, me desoldó los relés viejos y me soldó los nuevos (8 patas cada uno) alguien que sabe mucho más que yo y está acostumbrado a lidiar con ese tipo de cirugía.
Suerte, y 73 Fernando EA4BB

Aqui tienes las respuestas a tus preguntas, un saludo
http://www.ea2ok.com/2013/11/problema-con-el-expert-1k-fa.html
Actualizo el enlace por si alguien más necesita la información, ya que el anterior no funciona:
http://ea2ok.blogspot.com/2013/11/problema-con-el-expert-1k-fa.html
EA2A Juanjo
Saludos desde Huesca
Inició el tema
EA1CN reaccionó
Este sábado por la tarde pudimos hacer la reparación del Expert.
Podéis leer mas información en esta página:
http://www.ea2ok.com/2013/12/expert-1k-fa-reparado.html
Actualizo el enlace por si alguien más necesita la información, ya que el anterior no funciona:
http://ea2ok.blogspot.com/2013/12/expert-1k-fa-reparado.html
EA2A Juanjo
Saludos desde Huesca
Actualizo el enlace por si alguien más necesita la información, ya que el anterior no funciona:
http://ea2ok.blogspot.com/2013/12/expert-1k-fa-reparado.html
.
Muy interesante la Web
Veo en la imagen que cambiasteis
los dos reles k1 y k4, te ha quedado perfecto.

.
.
.
73 Carlos EC1T
Carlos EC1T
Ex. EA1DVY
Soria in81
QDURE - https://qsl.ure.es
Imprime y confirma tus QSL en tan solo tres click.
Nunca fue tan fácil y cómodo
el confirmar tus contactos.
TIENDA ONLINE URE
Publicaciones, mapas, polos, camisetas, gorras, tazas, forros polares y mucho más...
WEBCLUSTER EA4URE
Conoce el nuevo WebCluster de URE, ahora con nuevos filtros e información y compatible con GDURE